
X-ui与宝塔共存无脑教程
安装宝塔
Centos全新安装命令:根据系统执行框内命令开始安装(大约2分钟完成面板安装)升级后可能需要重启面板
yum install -y wget && wget -O install.sh http://v7.hostcli.com/install/install_6.0.sh && sh install.sh
Debian全新安装命令:
wget -O install.sh http://v7.hostcli.com/install/install-ubuntu_6.0.sh && bash install.sh
Ubuntu/Deepin全新安装命令:
wget -O install.sh http://v7.hostcli.com/install/install-ubuntu_6.0.sh && sudo bash install.sh
Fedora全新安装命令:
wget -O install.sh http://v7.hostcli.com/install/install_6.0.sh && bash install.sh
装完宝塔装一下宝塔的建站LNMP
一键安装X-ui FranzKafkaYu版本FranzKafkaYu版本
*在安装前请确保你的系统支持bash环境,且系统网络正常
⚡从原版升级也可使用该命令,数据不会丢失⚡*
推荐安装3X-UI
bash <(curl -Ls https://raw.githubusercontent.com/mhsanaei/3x-ui/master/install.sh)
bash <(wget -qO- https://raw.githubusercontent.com/sing-web/x-ui/main/install_CN.sh)
bash <(curl -Ls https://raw.githubusercontent.com/FranzKafkaYu/x-ui/master/install.sh)
安装完全后宝塔安全界面放行x-ui端口,我的为54857 请输入图片描述
新建站点
站点DNS解析,新建站点

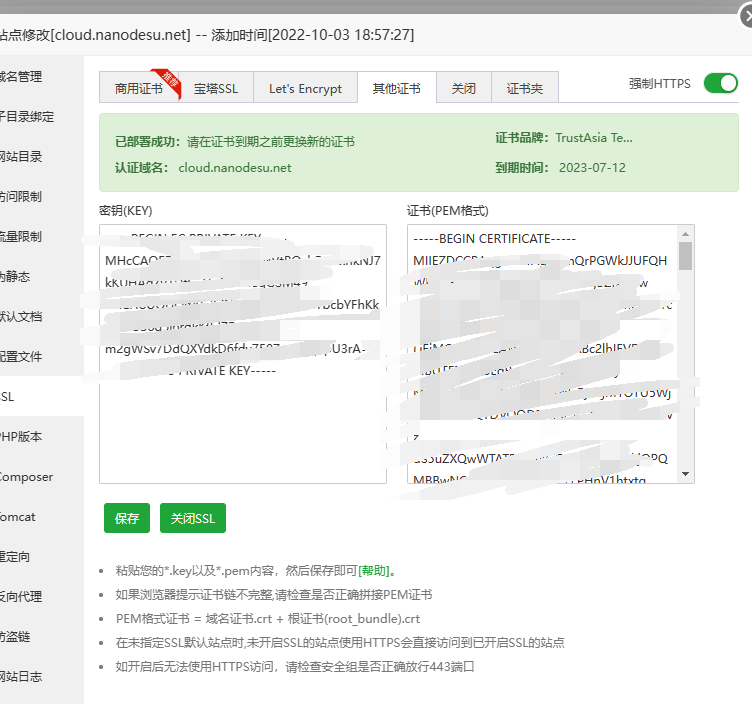
绑定证书
添加SSL证书
请输入图片描述
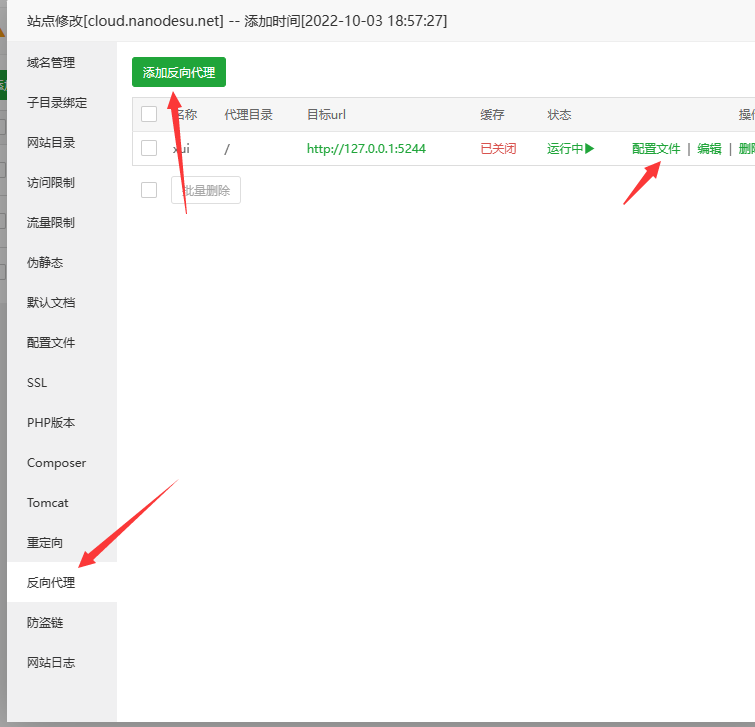
反向代理
添加反向代理,随便填一点东西,然后保存
在反向代理主界面点击配置文件,先清空配置文件
然后把以下代码复制到配置文件,保存
location ^~ /qwq {
    proxy_pass http://127.0.0.1:54857/qwq;
    proxy_set_header Host $host;
    proxy_set_header X-Real-IP $remote_addr;
    proxy_set_header X-Forwarded-For $proxy_add_x_forwarded_for;
}
location /emo {
        proxy_redirect off;
        proxy_pass http://127.0.0.1:58659;
        proxy_http_version 1.1;
        proxy_set_header Upgrade $http_upgrade;
        proxy_set_header Connection "upgrade";
        proxy_set_header Host $http_host;
        proxy_read_timeout 300s;
        # Show realip in v2ray access.log
        proxy_set_header X-Real-IP $remote_addr;
        proxy_set_header X-Forwarded-For $proxy_add_x_forwarded_for;
  }
  location / {
    proxy_set_header X-Forwarded-For $proxy_add_x_forwarded_for;
    proxy_set_header Host $http_host;
    proxy_set_header X-Real-IP $remote_addr;
    proxy_set_header Range $http_range;
    proxy_set_header If-Range $http_if_range;
    proxy_redirect off;
    proxy_pass http://127.0.0.1:56854;
    # 上传的最大文件尺寸
    client_max_body_size 20000m;
}
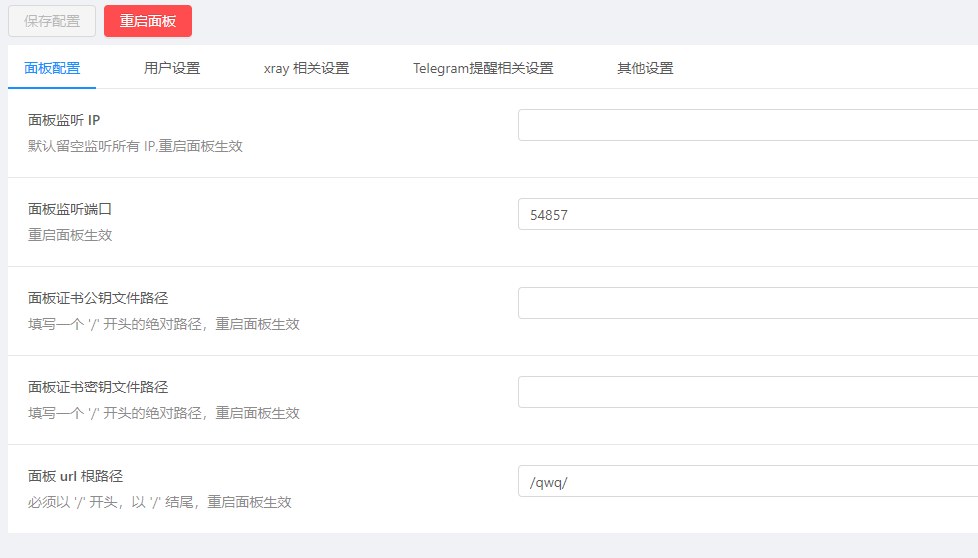
请输入图片描述
X-ui配置路径
面板路径
**端口54857
路径/qwq/**
请输入图片描述
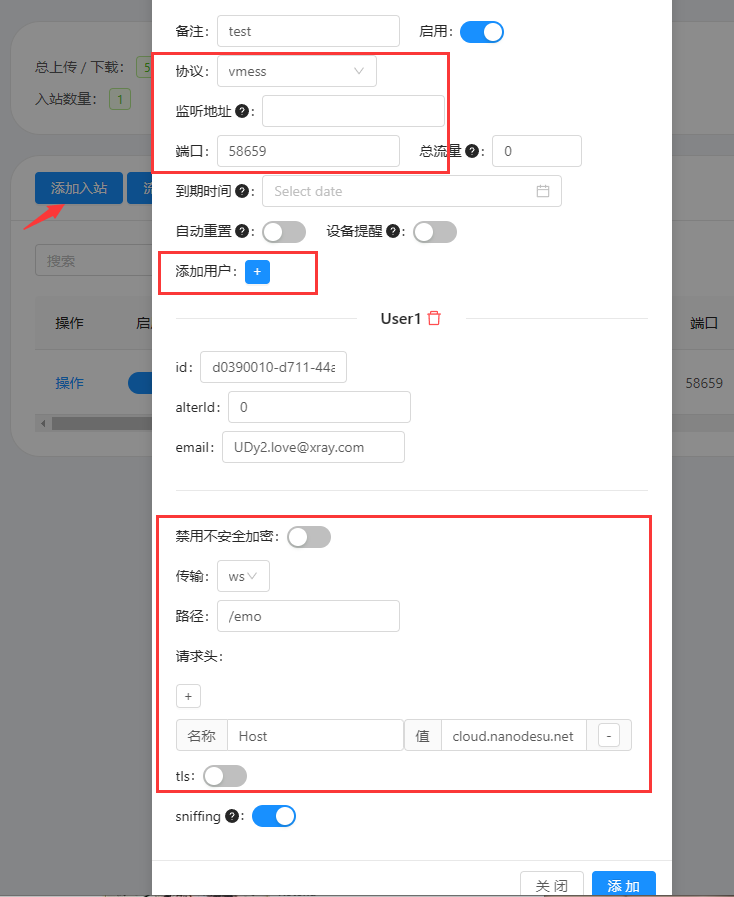
添加入站设置
协议选择Vmess,端口58659,这个跟你你nginx配置文件来,添加个用户
传输选择ws,tls关闭,因为宝塔的nginx接管了tls
路径/emo,这个也是根据你的nginx配置文件来的
请输入图片描述
反向代理Alist伪装
仅支持Linux-x86_64/aarch64平台。
一键脚本
curl -fsSL "https://alist.nn.ci/v2.sh" | bash -s install
更改Alist的默认端口
vim /opt/alist/data/config.json
请输入图片描述
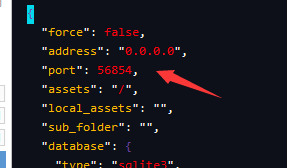
esc :wq
保存退出,重启Alist
systemctl restart alist.service
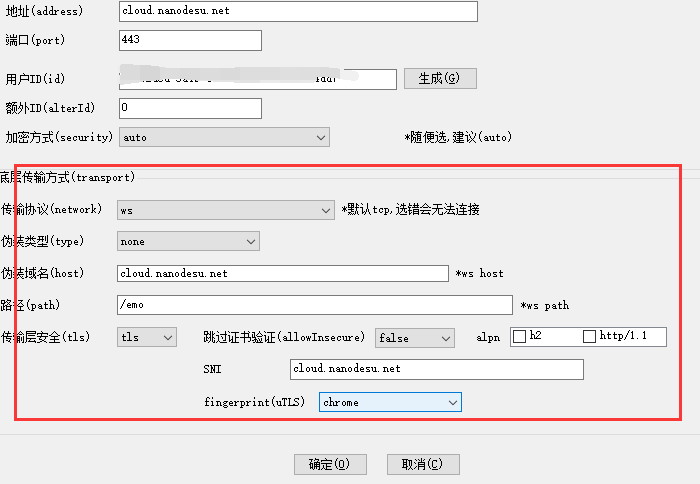
客户端配置
跟着图片改就行了
fingerprint(utls)改成chrome

This message is used to verify that this feed (feedId:71874328583859200) belongs to me (userId:71874237601482752). Join me in enjoying the next generation information browser https://follow.is.
The workout routines may be added to any of your workouts depending in your
exercise goals. Our barbell shoulder workout applies the fundamental scientific principles to provide the best exercises to observe.
Variations of the barbell shoulder press embrace the barbell bench
press and push press.
If you combine and match the proper exercises, you’ll be able to stability things out very nicely.
A widespread criticism of getting older is shoulder pain, particularly difficulties
in raising the arm above the pinnacle. This can interfere with every
day actions like getting dressed or doing household chores.
Explore Hydrow’s library of 5,000+ rowing, circuit training, yoga, Pilates, and mobility workouts.
Resistance band pull-aparts are great for shoulder stability and
posture. And as you do so, keep those elbows tucked rather than flared out.
In this article, we’ll check out a leg workout
that is effective for gaining muscle mass and increasing your strength.
We’ll cowl the most effective leg workouts, sets and reps,
and other essential elements in your features. Your shoulder muscles
are made up of the anterior deltoid, lateral deltoid, and
posterior deltoid. Whereas these muscular tissues are referenced individually, they’re actually a
steady association of muscle fibers that share the same tendon. The rotation that takes place during each movement will also stabilize the muscle tissue around
the shoulder joint, contributing to improved stability.
The angled nature of the landmine press also permits for a more natural and shoulder-friendly urgent motion, which
may cut back the danger of shoulder impingement.
The rotator cuff is a bunch of shoulder muscle tissue
originating from your shoulder blade that inserts
into the head of your upper arm bone. They help in stabilizing the top of the upper arm bone in addition to rotating it.
Your shoulder muscular tissues are also referred to as the deltoids, and they are
what make up the rounded form of your shoulders. This article incorporates an efficient shoulder
workout for building larger, stronger shoulders that move nicely and pain-free.
If you’ve access to a set of dumbbells but not a full gym, you can nonetheless get
a really efficient shoulder exercise. We additionally need to train the shoulders via their complete
vary of movement, including on stretch, to find a way to construct shoulder strength and size.
The finest shoulder exercises even have to make sure we
correctly activate the shoulders, create overload, and embody explosive motion.
Here’s an instance of an exercise substitute for every of
the strikes included in the authentic plan. In athletes, it normally comes in the form of overuse injuries or improper mechanics.
The point is that in order to carry out daily and lifting tasks optimally, your arm wants a steady base.
The capabilities of the anterior deltoid are flexion, horizontal flexion, and medial
rotation of the shoulder joint. As such, it’s strongly concerned in overhead
presses and entrance raises. Many so-called useful health experts are very
quick to throw shade at the shoulder press machine.
They say it doesn’t train your muscles and joints as they work
naturally.
The mind-to-muscle connection is an old-school idea—been around long earlier than the
health business as we know it right now. It’s all about
really focusing in your muscular tissues throughout a workout—before,
throughout, and after. You’ve obtained to picture them working, feeling the stress, and imagining the
resistance being tougher than it really is. Security suggestions
and setupMake certain your parallettes are on a secure, non-slip floor.
Warm up those wrists, shoulders, and core beforehand to keep injuries at bay.
Keep your elbows tucked in and control the movement to
guard your shoulders from any pressure. If you’re utilizing a 4-week workout plan, where every week has different workout routines to hit
the same areas.
Pushing through that type of fatigue can lead to a bummer of an harm since your wrists are
copping all your physique weight. Pseudo planche push-ups on parallettes are all about
smashing these anterior deltoids (front of the
shoulders), whereas additionally firing up the chest, triceps, and core.
With this push-up variation, you’re leaning forward over the parallettes, loading
up your shoulders, and constructing some severe entrance delt strength.
The extra you lean forward, the more it mimics a planche, serving to with shoulder stability and
pushing power. Your shoulder muscular tissues
(the anterior, medial, and posterior deltoid muscles) are engaged in hottest body weight workout routines, like planks and push-ups.
References:
Pro bodybuilders steroid Cycles
70918248
References:
effects Of steroids on The body
As a fitness fanatic, I’ve come throughout quite a bit of information surrounding Anavar and its effects on weight reduction, and I’d like to share my insights with you.
To optimize the advantages of Anavar, it’s sometimes suggested to maintain an Anavar
cycle for a length of 8-10 weeks. Anavar can be administered in a number of doses in the
course of the day, but it is commonly favored to be taken within the morning due to its brief half-life.
The typical Anavar cycle for women does not name for big doses – particularly when you’re a
beginner. A good Anavar dosage for a new female consumer is between 5mg
and 10mg per day, whereas most advanced women will top out at 15mg-20mg.
Nonetheless, the precise quantity of weight reduction will differ depending on components such as diet, exercise,
and individual response to the drug. Efficient management of these potential unwanted effects necessitates proper
post-cycle therapy and upkeep of a well-balanced diet.
Abuse of Anavar can also trigger testicular atrophy and endogenous
testosterone suppression. If users fail to implement an efficacious post-cycle
therapy promptly after cycle cessation, they might experience long-term injury
to the HPTA. Anavar is mostly considered “female-friendly” by our sufferers
when taking 5–10 mg per day for 5–6 weeks.
Bodybuilders usually stack Anavar with different steroids in order to maximize outcomes.
While there are many completely different steroids on the market,
Anavar is one of the best for those trying to get
shredded. This discomfort is likely due partially from elevated blood values brought on by an increase on the presence or absence of
water, which affects how well nutrients are absorbed into our bodies.
Medical research also demonstrates this, with customers experiencing endurance
enhancements of 68% from three weeks of supplementation (4).
This happens due to Cardarine changing fast-twitch fibers to slow-twitch ones (5).
ALT and AST liver enzymes will also expertise an upturn during LGD-4033 cycles.
In this occasion, TUDCA may be taken at 500 mg/day to forestall hepatic stress.
Any hepatotoxic substances, including drugs or alcohol, ought to be abstained from.
Clenbuterol stacks properly with other cutting compounds,
amplifying the overall fat burning effect of your cycle.
Anavar and tren are fully unique anabolic steroids, with Anavar producing delicate side effects and
tren producing harsh ones. Anavar can subsequently be utilized by newbies or advanced steroid users, whereas
tren ought to only be utilized by the latter.
For endurance athletes, a lower Anavar dosage of round 20mg to 40mg per
day may be adequate. This dosage can enhance stamina and
endurance without significantly impacting weight or inflicting unwanted unwanted
effects. S23 may be regarded as both essentially the most beneficial or detrimental SARM, contingent upon an individual’s genetic makeup and response to the drug.
(2) Schimrigk, Häusler, G., Blümel, P., Plöchl,
E., Waldhör, T., & Frisch, H. Calorie intake must be tailor-made to a user’s objectives when cycling Anavar.
Subsequently, if Anavar is taken with the intention of bulking and gaining lean mass, then a small calorie surplus could
also be adopted to enhance muscle and strength outcomes. We discover injectable trenbolone poses little threat to the liver in average
doses, with it rapidly coming into the bloodstream as an alternative of passing via
the liver. Nonetheless, methyltrienolone, or oral trenbolone, is severely hepatotoxic and consequently is not utilized
in drugs, with analysis deeming its toxicity unacceptable (31).
Regardless Of the above protocol being efficient, DHEA is the official medical treatment prescribed
to women for low androgen levels. Over half a century later, numerous women have
used Anavar anecdotally and in analysis.
This consumer skilled notable will increase in muscle hypertrophy and fat loss from this protocol.
Anavar is certainly one of the mostly used slicing
steroids, dramatically enhancing fats loss while retaining (or adding) lean muscle.
The majority of anabolic steroids are extremely unsuitable
for women, primarily as a outcome of they aren’t delicate and tend to have potent androgenic effects.
Girls looking for to maintain up feminine traits have very limited choices by way
of steroid use. The described steroid chopping cycle for ladies is often adopted by female bikini models and bodybuilders
aiming to reduce body fats.
Our tests of patients utilizing trenbolone usually indicate excessive elevations in blood
stress and important testosterone suppression. Furthermore, trenbolone is not appropriate for women in search of to avoid the development of masculine options.
Research signifies that if a person administers Anavar and does not lift weights, any improvements
in muscular strength or mass may be short-term (29).
Concerning the length of the cycle, it’s sometimes best to maintain it between 6 to eight weeks.
Prolonging the cycle might lead to liver pressure and other health issues.
Usually speaking, males shouldn’t exceed 8 weeks of use for gains in dimension and energy.
Women, however, may consider using it for up to 12 weeks
if they wish to cut fat with minimal unwanted effects.
If you may be stacking Anavar with other steroids, you will
want to start with a lower dosage of Anavar and increase
it gradually.
References:
strength steroids
It is important to note that longer cycles might increase
the risk of side effects and suppress natural hormone manufacturing.
Testosterone substitute therapy does not require customers to
implement cycles. Nevertheless, bodybuilders using supraphysiological doses of testosterone or other anabolic steroids aren’t advised to
take them repeatedly because of prolonged toxicity.
Anadrol is an oral steroid, which makes it advantageous for people who wish to circumvent injections.
Anecdotally, we now have observed that first-time
Anadrol cycles can produce over 30 pounds in weight.
Women at our clinic have reported a mild downturn in vitality, libido, and fatigue following an Anavar cycle.
In clenbuterol’s case, because it does not have an result on the hypothalamic-pituitary-testicular axis
(HPTA) but as a substitute the central nervous system, women typically take an analogous
dose to men. Due to the stimulative effects of clenbuterol, energy and motivation ranges
are prone to enhance. With very cautious doses (5
mg), it may be potential to keep away from virilizing unwanted effects; nonetheless, every girl may reply differently.
This is a standard follow-up cycle to the primary Anavar and testosterone cycle listed.
Essentially, it has much less of an impact on intercourse traits
and more on muscles. Anavar is an especially in style anabolic steroid for many obvious reasons, however it is also generally identified as being one of
the most expensive anabolic steroids anyone is
prepared to purchase. However, as a result of Anavar does impose some strain and toxicity within the area of liver
function, it cannot be utilized for the same size of time as those core injectable compounds can. Therefore, it’s usually included initially of any cycle for the first 6
– eight weeks before it’s discontinued. Anavar cycles can be extended to a maximum of 10 weeks at an inexpensive dosage, nonetheless,
because of its decrease diploma of liver toxicity
than other oral compounds. Anavar is unlawful to buy for bodybuilding functions because of the Anabolic Steroids Management Act of 1990
(3). Buying anabolic steroids from unregulated sources poses significant
health dangers and authorized penalties.
However, these unwanted effects are sometimes minimal at decrease doses and can usually be alleviated by
taking Anavar with meals. The optimum Anavar dosage for endurance athletes
ranges from 20 to eighty milligrams per day, relying on your expertise level and goals.
Newbies ought to begin with a low dose of 20 to 30 milligrams per day, while extra experienced athletes could benefit from a better dose of up to 80 milligrams
per day. Place your order now and expertise the benefits
of 10mg Anavar in your health objectives. This medicine
should not be used if you have a selected medical condition.
If you have breast cancer, prostate most cancers, or sure mineral imbalances (high blood calcium levels) in men, seek the advice of your
physician or pharmacist before utilizing this drug.
It helps regain weight misplaced after surgery, severe trauma,
or chronic infections.
Individuals skilled increased muscle fiber cross-sectional space, correlating with enhanced strength and endurance.
Anavar is an oral anabolic steroid derived from dihydrotestosterone (DHT).
It was initially developed for medical purposes, corresponding to selling weight achieve
in people recovering from illness, surgical procedure, or
trauma. However, its muscle-preserving and fat-reducing properties rapidly made it a favourite among bodybuilders and athletes.
Though Anavar has gained popularity as being a ‘cutting agent’ or
‘cutting steroid’ throughout the past, its capabilities usually are not limited strictly
to this. Although it could possibly carry out and assist quite properly in the space of reaching
fat loss and physique definition, it is a superb
compound for mass gaining, power, and bulking.
A check can decide if Anavar is actually current within the
compound or not. There are additionally purity exams
that may measure the dose of Anavar, thus telling you whether it’s true
to the label or undercut. Typically, this crash isn’t deemed to be excessive and thus girls can do nothing
and still recuperate inside a quantity of weeks to a few months.
In which case, if women did begin to discover decreased breast measurement (for
example), they could decrease their dose to prevent further virilization. Due To This Fact should you take a average dose,
for a brief cycle, the possibilities of virilization are extraordinarily low.
It’s also essential to note that virilization doesn’t occur overnight, however
as an alternative is a gradual impact. In analysis, outcomes show that Anavar does
have the chance to cause masculinization in women and girls, nevertheless,
the dose would must be high and brought for
an excessive time frame.
We ought to note that clitoral enlargement and deepening of the voice are side effects that may turn out to be permanent.
If you’re cutting and you may be consuming a calorie surplus food
regimen – we advocate beginning with 50mg of Anavar per day.
For instance, if you’re cutting and you are eating a calorie-deficient food plan – we recommend
starting with 20mg of Anavar per day. If you are an skilled user and you weigh 200 lbs,
we suggest starting with 100mg of Anavar per day. If you are a beginner, we advocate beginning
at the lower end of the dosage vary (20mg). If you’re an skilled
consumer, you can start on the larger finish of the dosage vary (50mg).
When we additional consider this steroid can’t result in water retention, a attainable burden to many athletes, Anavar rest as one of the high athletic
choices. Anavar binds to the Androgen Receptors (ARs) of
the muscle cells and stimulates protein synthesis,
which increases muscle growth, lean body mass, and bone
mineral density. You could do this by measuring testorone levels, taking
blood samples, and so forth. It’s best to get this accomplished earlier than taking any performance enhancing
drug so you know your ranges before taking, while taking and after taking.
Tablet fashioned steroids like Anavar are very fashionable because they can be consumed orally and no injections are needed.
Anavar is typically very expensive to buy, because it’s one of
the most coveted AAS on the black market. The purpose it’s so well-liked is as
a result of it’s a really mild steroid, which means unwanted
facet effects are so much less compared to other steroids.
By Way Of its use, you’ll have the ability to address
unnecessary deposition of fat for those, leaner, dry gains.
Taking under consideration the proscribing
capacity to endure steroids, women shouldn’t accept in extra of 5 mg/day within the primary week.
Anavar Steroid is a helpful steroid with a excessive anabolic to androgenic ratio, nevertheless it should be
used in decrease dosages and with caution to keep away from
excessive unwanted effects and androgen exposure. This restoration course of is prone to happen in 30 days or much less when using an efficient PCT (post-cycle therapy).
Nonetheless, it must be famous that Turinabol and Anavar’s anabolic attributes outweigh their
capability to induce fats loss.
This characteristic is particularly appealing for female athletes who want to avoid the development of masculine options such
as deepening of the voice, excessive hair growth, or clitoral enlargement.
Oxandrolone can be stacked with different anabolic steroids in synergy as a result of they complement one another.
Anavar, because of its broad number of effects, can be utilized to
your goals whether or not you’re slicing, bulking, or you’re male or
female. It’s one of the mildest compounds out there to the steroid user, and for
that purpose, it can be used for a long period if blood work is finished
and organs and blood stress is checked regularly.
It isn’t exceptional to run Anavar for ten or so weeks increasing the dose over time to stop the onset of a tolerance increase with
a testosterone preparation, such as Sustanon.
References:
gain muscle without steroids
It is significant to adhere to really helpful cycle lengths and dosages,
as excessive use can lead to opposed side effects. As the week’s progresses, male users can expect a substantial enchancment in total body composition, showcasing a more chiseled look.
The drug’s capacity to reinforce metabolic rates dramatically contributes
to those outcomes. Coupled with a rigorous workout routine and a calorie-controlled food plan, people can obtain spectacular
results that last nicely past the cycle. An eight-week Anavar cycle can serve as a substantial milestone for customers, allowing them to understand the drug’s
potential effects on their our bodies.
Anavar should be sourced rigorously to guarantee you get what you need – accurately dosed
and high-purity Oxandrolone (preferably pharmaceutical-grade).
Availability and ease of access, authorized situations,
and pricing of Oxandrolone will differ throughout different elements of the world.
How a lot you’ll find a way to carry is dependent upon each
individual, however as a share, you’ll be able to expect
to be lifting 20% heavier or much more. That doesn’t imply pushing
it until you’re injured – frequent sense guidelines should still
apply, and additional attention must be paid to rest between sets.
Having a PCT plan able to go for the tip of your Anavar cycle is
an easy means of avoiding low testosterone. Anavar has
a profit here and may actually have a more constructive effect on your tendons and joints.
Deca Durabolin has long esters and thus is a slow-acting steroid, therefore the lengthy ten-week cycle.
This Sustanon 250 cycle is likely to proceed adding mass to users who have already taken a cautiously dosed testosterone cycle beforehand.
Sensitive individuals who are susceptible to unwanted aspect
effects with testosterone are prone to experience the identical outcome with Sustanon 250.
However, sperm quantity and quality typically improve post-cycle over a number of weeks or months.
Anavar is a C17-alpha-alkylated oral steroid, meaning
the compound shall be fully energetic after bypassing the liver.
Nonetheless, in contrast to different oral steroids, Anavar just isn’t significantly hepatotoxic.
This is as a end result of the kidneys, and not
the liver, are primarily answerable for metabolizing Anavar.
Nonetheless, we find this to be a smaller percentage compared to other C17-aa steroids.
In our expertise, women can typically expertise superior
results in muscle mass compared to males on Anavar, even with a modest dose
of 5–10 mg per day.
In the next many years, this artificial hormone’s reputation continued to grow among feminine
bodybuilders. Its low-androgenic properties and lower threat of virilizing results, similar to deepening voice and excessive hair growth, made it a
more engaging possibility when compared to harsher anabolic steroids.
Many professional and novice bodybuilders appreciated Anavar for its capacity to extend muscle hardness and density
without compromising their femininity. As you enterprise into the second half of the cycle, the impact of Anavar
would possibly become more visible. Your coaching could yield larger features in power and endurance, enabling you to feel the distinction and elevate your exercise periods.
With its known advantages on collagen synthesis (after
all, Anavar was initially developed to promote healing),
it could reduce soreness and ache post-workout.
As a treatment for anemia, Anavar has a very useful effect on pink blood cell
count21, bringing about heightened endurance by transporting extra oxygen and nutrients to the muscle tissue throughout exercise.
This has a performance-enhancing and physically appealing effect, with extra oxygen and blood being carried by way of
the veins, resulting in enhanced vascularity.
The actual anavar has lengthy been well-liked among health buffs and those who want to gain muscle tissue shortly.
Nonetheless, Anavar standalone is best for both sexes when making an attempt to reduce weight and physique fats, and
the impact must be even more apparent for males when it’s mixed with testosterone.
Ladies who want to try this and not worry about Anavar unwanted
effects should begin with 2.5 or 5 mg every day and through a
6 week cycle, enhance the dosage up to 10 mg.
When weight-reduction plan or performing heavy
cardio to lose fat, there’s at all times the chance of shedding priceless muscle mass as well.
Even at low doses, it can assist keep and even slightly increase muscle mass.
So, you could find that your muscular tissues aren’t only looking leaner but in addition feeling stronger and
denser.
We have found the risk of virilization to increase when stacking Anavar and Winstrol collectively.
Thus, we solely see this tried in sure circumstances, similar to making ready for
an necessary competitors where there’s pressure to position high.
This stack will significantly enhance muscle-building and energy outcomes in comparison with
an Anavar-only cycle.
Being such an incredible product that can help girls a lot and so in style,
plenty of newbies try to search for details about what results does Oxandrolone has on a woman’s physique.
And as we know – a picture is value a thousand
words and that’s why Anavar before and after women outcomes pictures are
so well-liked. Sustanon 250 and different testosterone esters will elevate
LDL levels of cholesterol, causing some cardiotoxicity.
Sustanon 250 doesn’t typically cause hepatic (liver)
implications due to it being an injectable steroid.
Most of our patients find testosterone substitute therapy
manageable and don’t endure from gynecomastia. However, for people who do, such estrogen-related side effects can often be controlled with both an anti-estrogen or AI (aromatase inhibitor).
By exploring the benefits, proper usage, and accompanying methods, we aim to equip you with
priceless insights to embark on a successful Oxanabol journey.
Uncover the potential of this remarkable steroid and
witness the transformative power it holds for girls in search of impressive physique enhancements.
For occasion, if you would like to cut, you’ll be able to stack Anavar with Winstrol or Trenbolone.
Not just this, they are known to enhance fats loss whereas rising lean muscle mass within the physique.
Nevertheless, stacking Anavar with Winstrol or Trenbolone can worsen the side effects.
References:
legal steriods (Ira)
70918248
References:
lean Mass Steroid cycle
70918248
References:
steroids for fat loss
70918248
References:
Steroids With Less Side Effects – Bellavita-Lefkada.Gr –
70918248
References:
best steroid to lose fat (alpiocafe.com)
70918248
References:
steroid.com review
70918248
References:
nandrolone steroid (88daga.Com)
70918248
References:
none (http://www.iheir-6.com)